ExpiCulture — Developing an Original World-Traveling VR Experience
Want to experience 4 cultural landscapes in 5 minutes? I got you covered…
The cultural unit for my human geography class in both middle and high school was amusing. It puts me in the perspective to see what people value, know, believe, and celebrate around the world. Learning about other cultures draws me out of my own little bubble to understand the diverse community of individuals around me.
However, learning about culture from an outside perspective without being indulged in any of it really sucked. I wanted to see models of cultural creations up close, walk around landscapes, and really feel present in a space I’m not familiar with, so just like you guessed, I created a VR game from scratch to make it come true!
ExpiCulture Overview
From a first-person perspective, the player gets to navigate around 4 cultural landscapes (parts of Asian, Western, African, and Island cultures) to collect a total of 18 artifacts. The experience allows the player to visually grasp cultural features and notice how different they are in terms of the environment, tools, landforms, religious buildings, weapons, etc. This isn’t the typical look into other cultural landscapes through a textbook or computer screen, players are in it!
Key Components
Overall, two components covered the game:
- Landscaping — designing and building 4 cultural landscapes.
- Basic functions — programming games objects and UI for a working player experience.
Putting Visuals and Landscapes Together

A key part of this game is visual components because the details and art of cultural landscapes are emphasized to help players stay engaged and retain specifics better about cultural experiences.
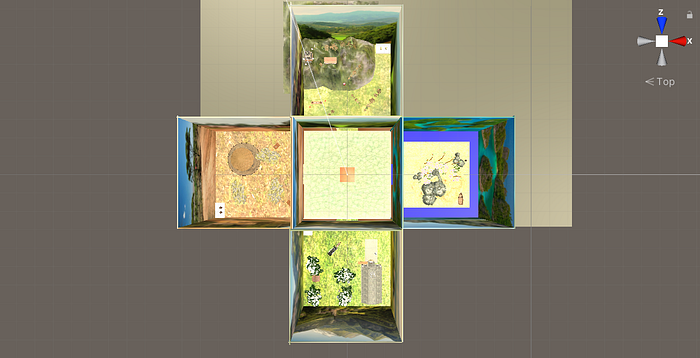
I started by creating and scaling a cube game object into a thin square floor. I then duplicated the floor and rotated it to be a vertical wall by assigning the rotation of the game object’s x-axis to be 90 degrees. I duplicated the wall 23 times and the floor 4 times. I also shortened 4 walls and scaled-down 8. Now I have all the pieces, and I simply arranged them into the framework shown above!
Trending AR VR Articles:
1. The Possibility of AR on the Urban Space
To build onto the backgrounds of cultural landscape boxes, I imported images and added them as the base map of materials. This way, when I applied the materials to the wall game objects, the walls would show the background images. The same goes for coloring all other game objects like artifacts and floors.
Then comes the part that takes forever. I had to go scouting for assets and models, free ones too (big shoutout to https://free3d.com/ for blissfully being a website out there). The limits to the free models I can download are also why I could only represent parts of cultures like those in Asia (I promise I know China and Japan aren’t the only countries there).
For every single game object, I downloaded its files from the website, extracted the zip, imported the files to Unity, made new materials, applied textures to material base maps, applied material to the game object, and arranged every scaled object to its proper location. Since the imported models were mesh, I also had to add the component mesh collider under each game object from the inspector so players wouldn’t walk through a supposedly solid object in the game.
Eventually, after hours of repeating the process for dozens of game object imports, I had a completed game map:
Importing and Tweaking an FPC

Once all landscapes were set up, I was ready to make a player. I began by creating a capsule game to act as the body of the player. Programming the first-person character is time-consuming and in the real world, available assets are imported instead because why make a resource when it’s already out there?
From the Unity Asset store, I downloaded the free Standard Asset. After it is imported, I found the First-Person Controller object in the asset and dragged it into the hierarchy. I deleted the default main camera and positioned the First-Person Controller camera from the scene onto the top of the capsule game object. I named the capsule PlayerController and attached it under the First-Person Controller so the camera from the asset would follow the capsule body wherever it travels like a pair of eyes.
Unfortunately, 3 scripts in the FPC of the standard Unity Assets don’t work in the 2020 version of Unity, so I found 3 standard asset fixes to patch up the error files with appropriate ones. In-game view, the player is now able to look around in the first-person perspective, walk around, and jump!
Organizing Standout Artifacts
To add some more movement to the game and make artifacts distinguished from regular objects, I decided to make them rotate.

I created the Rotator script using a transform.Rotate function again (like from the Sonic Roll-a-Ball VR game I made) to refer to the transforming rotation component. This time I changed the degrees of rotation to 0 on the x and z-axis. I programmed for artifacts to rotate 30 degrees on the y-axis so most artifact game objects would spin along their vertical center. I then added this script as a component to every artifact game object.

To organize the artifacts in the game, I created an empty in the hierarchy to store all the artifacts in one place. This way it would be easier to change the components of all artifacts later.
Programming Collection
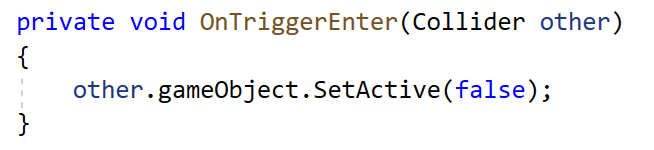
I’ve got rotating artifacts ready to go but having them be indestructible forces that just rotate forever in the game wasn’t the goal. I needed to make it so collecting these artifacts was possible. Back in the first-person controller script, I added an OnTriggerEnter function which runs if the player collides with a game object that is set as a trigger. Under the function, I correlated a boolean value of false to whether the game object is active or not. Later on, this action will be called based on an if statement.
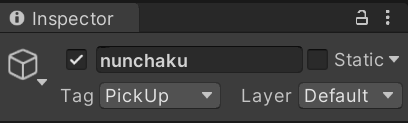
Next, to make sure this whole function only activates if it is tagged as a pickup artifact, I created a new tag called PickUp and applied it to all artifact game objects in the game.
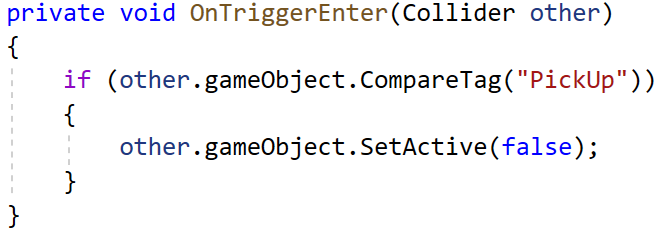
A conditional if statement is established afterward so the object only deactivates and disappears to be collected if it is tagged pickup.
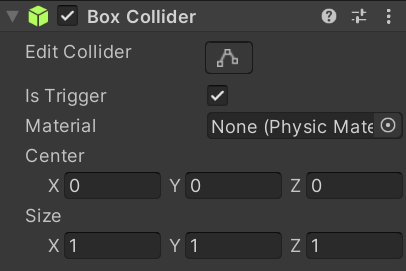
However, even if I test the game out at this point, the artifacts won't disable on collision. This is because the game objects are using normal colliders and not triggers, so in the box collider component for the artifacts, I enabled is trigger.
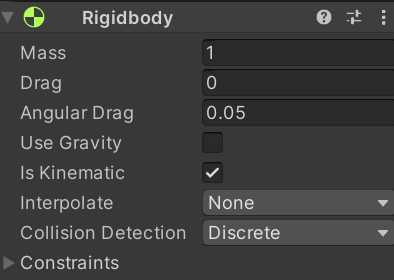
The last tweak I did is add a rigidbody component to the pickup objects where I disabled gravity so the artifacts won’t be pulled down and fall through the floor. On the other hand, even if the cubes don’t react to gravity, it reacts to other physics forces, so I enabled is kinematic. This way, the artifacts won’t react to physics forces.
Creating a UI for Score and End
Now that the artifacts are collected and ready to go, I need to program the game to count the artifacts collected and display the value to the player! Scripting again in the First-Person Controller scrip, I made a count variable to store the value of collected artifacts. The count is set to 0.
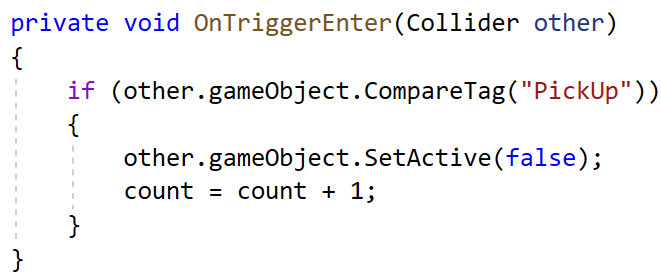
Of course, the number of artifacts the player has collected isn’t always going to stay zero. Thus, under the OnTriggerEnter function, I added a line of code that increases the count value once each time the player collides with an artifact game object.
To display the count I imported a TextMeshPro UI package. This comes with a canvas and event system, which I adjusted and named CountText.

To implement this new feature, I established a SetCountText function to tell Unity what to display in the UI.
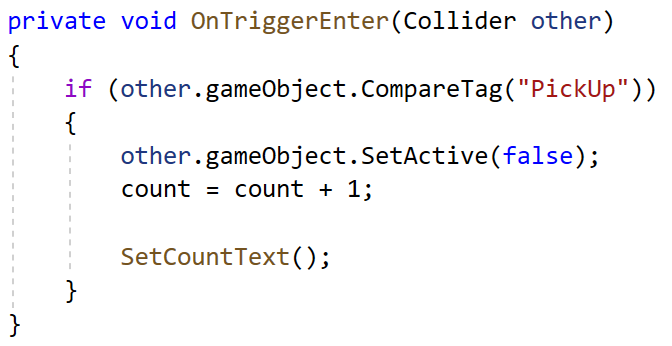
I then called it at the end of the OnTriggerEnter function so the display of the number of artifacts the player has collected is updated each time they collide with another artifact.
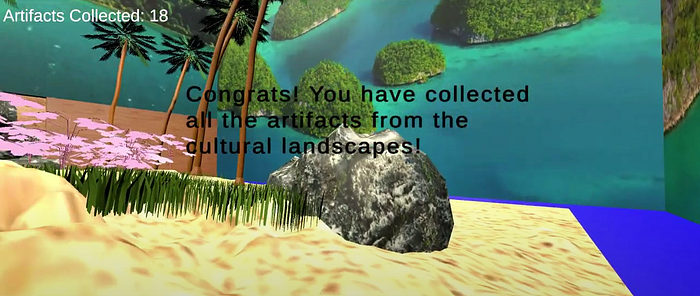
The count UI element works now, but I need to indicate to the player when the game ends with a congratulations message. I added another TextMeshPro element and edited what text would be displayed in what position of the UI canvas.

I added a second reference to this UI called it WinText and set it to a boolean value of false so the message doesn’t show at the start of the game. Under SetCountText, I then programmed it so WinText only runs if the count variable for the number of artifacts the player has collected is greater than or equal to 18 (number of artifacts the player has to collect). With this final touch finished, so was the game!
Building On
My fourth VR game is now pumped out! The making of this game got me to understand the structure of C# scripts a lot more and realize how important it is to keep everything labeled and organized in the editor. Now, I’m planning to learn about more complicated C# coding and look into details like shaders and particle effects. It’s amazing how I can create a part of the world, and in the future, possibly the universe.
Thanks for reading! Any feedback, applause, or comments are welcomed. If you found the content enjoyable, follow me on Medium! Feel free to connect with me via email (Jolie837837@gmail.com) and LinkedIn!
Don’t forget to give us your 👏 !